Saturday, September 29, 2012
The waiting game....
My brother-in-law's wife is about to have a baby....any minute! So, since of course I want the gift to be ready to run out the door when we get the call, I had to get this card done and ready to go! No, she's not having twins. I made the one on the right first and my "onesie" looked more like a dress with leg holes, so I tried it again with different dimensions. Still doesn't look exactly like a onesie, but it will have to do. I happened to be chatting on the phone with my mom while I was making these so, I sent her a picture to get some advice/reassurance. She loved them and asked if she could have the extra to give to her co-worker. Perfect, two birds/one stone. Also, I've resolved to just get my lightbox out and leave it out, so sometime in the near future my photos will be slightly better.....promise..
Friday, September 14, 2012
Perfectly Penned
This card was a complete "work in progress". I had no vision for what it was going to be. I started with the colors I saw from a Colour Q challenge. I was going to submit it, but unfortunately I didn't finish the card in time. Oh well, I'll try again for next week. I also originally started with a sketch from Mojo Monday but I had a really hard time with it, so strayed from the challenge a bit. The stamp set it Perfectly Penned, of course. It's the set I turn to most often! I love it!! (Have I ever mentioned that? haha) I'm going to try to start doing some of the challenges we see out there in the blog world. I've had a hard time lately finding my mojo and I hear that's a great way to get a kick start. So we'll see....
Thursday, September 13, 2012
To a little Princess...
Hello there! Here's the card I made for my niece Jenelle's 4th birthday! She had a fun birthday party at a park and the boys had a great time running through the water fountain! I love making girly cards, but I don't really have any girly stamps. I made the crown on this card using oval punches. I started with the wide oval punch and then used the small oval punch (retired) to create the points of crown. And what little princess doesn't love bling?? The rhinestones on this card are not from stampin up, but just by chance they matched! I used dimensionals under the center of the crown to help give it the rounded look. I was really glad I got to give her this card in person rather than mail it, sticking it in an envelope would not have been pretty. Here's a pic that you can see a little more of the dimension of the card:
Wednesday, September 12, 2012
Use those scraps!!
Here's a first for me. DSP on the diagonal! Have you tried it? I love the effect! And it's a great way to use up some scraps! I really had fun creating this one! My "process" on this card started because I needed to clean up my craft table. I had scraps everywhere and what better way to procrastinate than to make a card instead of clean. By creating with the scraps, I didn't feel as guilty! The only thing that wasn't just sitting on my table for this card was the ink/markers. Turned out ok, I think! And at least I cleared some of the scraps! This stamp set has an image with a sentiment on each individual stamp. I wasn't thrilled with the sentiment combined with the image so I was going to cut them apart. I was a little apprehensive about "ruining" the set, until my friend Lorraine suggested just putting some tape over the image when I inked it and then removing it to stamp in the paper. Perfect solution! Thanks Lorraine!
Tuesday, September 11, 2012
Star Tree
The Star Tree was one of the stamps in the main catty that called to me as soon as I saw it! I bought it right away. I think it's perfect for heat embossing. The champagne glass glitter is definitely a test in patience for me, probably a huge reason I rarely use it. I find that it sticks best with the multipurpose glue, but seems to take forever to dry. I really like using Sahara Sand CS for a base, which reminds me, I'm almost out, time to re-order! One thing about this card though, again no sentiment.....where to put it? Maybe just on the inside?
Monday, September 10, 2012
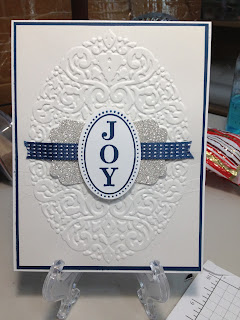
Quick and easy Joy
One of the things I love about Stampin' Up is how simple it is to make a fabulous card quickly! For me, this is one example of that! Shimmery white cardstock, one punch of glimmer paper and a small snippet of ribbon and tada! The Holiday Frame embossing folder gives subtle elegance and you could use any stamp in the Joyous Celebrations stamp set to coordinate perfectly inside the oval! And who doesn't love Midnight Muse? So rich and bold! This would be an easy card to make in bulk for your holiday cards and it really wouldn't take long at all!
Sunday, September 9, 2012
From the archives....
I made this card ages ago. It's been sitting in my "needs something" stack. I don't know exactly what it needs but I'm not satisfied. Time to move on. You can see how long this card has been sitting there because when I created it the 5-petal flower punch was current. Haha. There are a couple of things I actually like about this card though: Naturals White cardstock for the base, Going Gray ink for the sentiment, oh and anything in Island Indigo. Do you ever make a card and look back and think "why did I use THAT?" For this card, I can not understand what possessed me to use Riding Hood Red. That color is definitely not in my top 10 20 favorite colors. Maybe I was in one of those "try something out of the comfort zone" moods. What do you think? Should I change something? Move on? Throw it in the "circular file"?
Saturday, September 8, 2012
Tricky Treats
Let's start by acknowledging that my photography needs some help.......er, lots of it! Ugh. Anyway, here's a fun little Halloween card. I have made this style of card several times before. It's a great way to use up some scraps. Also, I taught my 4 year old how to make cards with this style. It's so easy for the little ones! There's really no wrong way to arrange the circles. And, my little guy LOVES using the Big Shot! He's really good at cranking the handle for me! Let me tell you, most of the conversations we've had in the craft room start with "Ok, now you can only do this when mommy is helping you....." He is definitely my little "artist". One of his favorite rewards for behaving at Target or Walmart is a ream of paper. Yep, that's it. A plain, white ream of printer paper all to himself to create whatever he wants! (It might last a week, if we're lucky.) Oh, and check out the knot....looks a little like a necktie. Definitely will have to remember that technique for Father's Day cards.
Friday, September 7, 2012
Betsy's Blossoms
I love using a stamp set in a way that is unexpected! Betsy's Blossoms is such a popular stamp set and I am definitely a fan! It's very spring-y, maybe even summer-y. (Ok, I'm making up my own words, you know what I mean.) But how about using this stamp for a holiday card! I think it works! I basically created my own DSP. That huge flower image in the set is so versatile! Love it! I used raspberry ripple and gumball green with a little crumb cake for contrast. The sentiment stamp set is an oldy but goody, Perfect Punches. I like the way the detail in the scallops of the circle coordinates with the big flower stamp from Betsy's Blossoms. And then I added a little crumb cake seam binding. Seam binding is definitely my favorite type of ribbon from Stampin Up. So easy to work with and just the right amount of elegance. Thanks for looking!
Wednesday, September 5, 2012
Watercolor Winter
This might be my favorite card that I've made in a while. And yet again, my photography isn't great. You can't really tell in this picture but the black paper is heat embossed with clear embossing powder using the poinsettia stamp from the watercolor winter stamp set. The brushed gold paper is dry embossed with the vintage wallpaper embossing folder. Cherry cobbler paper is cut with the apothecary accents framelits as well as the image and sentiment layer. I think almost all of my Christmas creations will include some bit of the cherry cobbler seam binding! I love it! The Watercolor Winter stamp set was not one of my favorites when I saw it in the catalog, to be honest, but I got it because I thought it would force me to do something new. I have to say, I'm pretty happy with it now! The two step stampin' is sort of fun!
Tuesday, September 4, 2012
In Color 2012-2014
This card uses all 5 new In Colors. The flower was made using the Floral Fusion sizzlet. I used Primrose petals cardstock and crumpled it, sprayed with some shimmer spray and then stuck it all together. I made the shimmer spray from the champagne shimmer paint and some alcohol, mixed it up in the new stampin' spritzer and voila! It adds just a little shimmer. It also makes it a lot easier to make that cute crumpled look. I wish the picture was a little brighter.....I gotta start honing my photographing skills...
Monday, September 3, 2012
Simple and Frugal
Just a few small bits of DSP make a big statement on this card. I love the patterns on this Howlstooth and Scaringbone DSP from the Holiday Catalog. I CASED this card from a card my friend Jenny made. I just changed the dsp and sentiment. This would also make a quick and easy Christmas card to make in a large quantity, if you needed a bunch. It wouldn't use too much paper either so it would be very economical.
Sunday, September 2, 2012
Masculine Congratulations
I made this card for a little Stampin' day we had a while back with a group of demonstrators. We all brought card ideas and the tools to make them and then we got to make each others cards. It was really fun and I got a ton of card ideas. On this card I used the Comfort Cafe DSP and the Apothecary Accents framelits. The ink is Midnight Muse and the Denim ribbon coordinates with it perfectly, I think. I think this card would work as a masculine card, and you could use any sentiment too!
Saturday, September 1, 2012
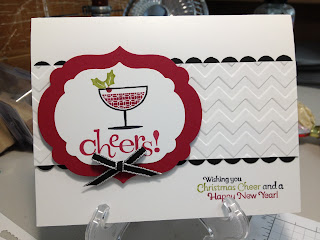
Cheers!
Cocktails anyone?? This stamp set was one that I got in my first order from the new catalog! It was a must have. It's pretty versatile too, with holiday stamps as well as birthday and any occasion-type stamps. This is one of my new favorite colors from Stampin Up too! Raspberry Ripple! It's so rich and beautiful. What's your favorite Stampin Up color?
Subscribe to:
Comments (Atom)


